


![]()
Quick Start Tutorial Part1
Quick Start Tutorial Part2
Quick Start Tutorial Part3
Quick Start Tutorial Part4
User Tutorials
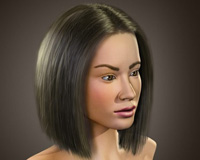
Realistic Hairstyling
Screen Capture Videos by Users
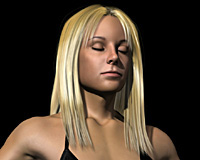
Long Hair Modeling
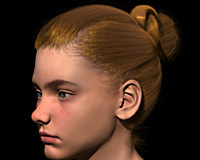
Bun Modeling
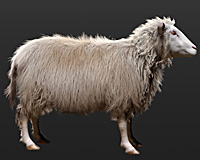
Sheep Fur Modeling
Quick Start Tutorial Part3
<< Back to Part 2: Hair Generation and Styling
Part 3: Hair Material Editing and Rendering
Before we continue, make sure that you changed U and V scale values of the HairStyle Kink modifier back to 1.0.
First, let's see how this hair model looks when rendered. When you generate hairs, Hair Farm Renderer is automatically added to both render effects and atmosphere effects, and it is ready to render hairs. Select the perspective viewport and render the scene.

This hair image is not very appealing without any shadows. Let's create a target spot light in the front viewport as shown below.

Now go to the target spot general parameters rollout, turn on shadows, and select the Hair Shadow Map as the shadow generator. The Hair Shadow Map is an enhanced version of the standard Shadow Sap that produces hair shadows (shadows cast by hair). When you select Hair Shadow Map, its rollout will appear in the command panel. You can use the default parameters for now. Towards the bottom of the Hair Shadow Map rollout you will see a combo box that allows you to select another shadow type for object shadows (shadows cast by objects). The default object shadow type is Shadow Map. If you'd like to use another shadow generator, you can select it here. In this example, we don't really need any object shadows. Select the perspective window and render again.

Notice that tips of the hair strands are thinner than the roots, which is visible in the rendered image. You can adjust the thickness distribution of hair strands from their root to their tips using the Thickness Curve. Similar to the way that the sytling modifiers work, hair thickness is only computed at hair vertices. Therefore, if you would like to represent a complicated Thickness Curve, you may need additional hair vertices. You can add these additional vertices here using Hair Generate parameters, or later on using a HairStyle modifier on top Hair Generate.
As we mentioned before, Hair Generate modifier is where we assign the hair material. Click on the material button (that says 'None') on the Material rollout. This will show material/map browser. Select Hair Material Realistic and click OK to assign this material to our hairs.
To edit this material we need to put it to the material editor. Open the material editor and then drag the hair material into one of the material slots on the material editor.
You will notice that the Hair Material Realistic is slightly different than the standard material. Instead of a single specular component, Hair Material Realistic has three: Primary Specular, Secondary Specular, and Transmittance. As you can see, the Secondary Specular and Transmittance parameters are disabled by default and both Auto buttons are checked. In this state the Secondary Specular and Transmittance parameters are adjusted automatically based on the hair color and the Primary Specular parameters. Without changing any parameters, render the perspective viewport to see the result.

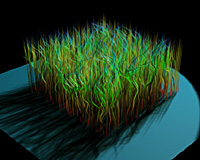
For more realistic results we often assign slightly different colors to each hair strand. You can use Hair Color Variation map to achieve this. On the Hair Material Realistic properties, click on the diffuse color map button to assign a Hair Color Variation map. On the Hair Color Variation properties keep the mode HSV and set S variation to 0.2 and V variation to 1.0. Right below the values you can see a preview of a number of colors generated using these variation settings. Once again, render the perspective viewport to see the result.

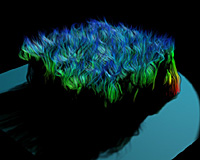
Now we have a different color for each hair strand, but the color of a hair strand is the same all the way from its root to its tip. Let's see how we can change this. On the Hair Color Variation parameters, click on the map button and assign a gradient map. Let's exaggerate the effect by setting the three gradient colors as red (255,0,0), green (0,255,0), and blue (0,0,255). The following is the rendered image with these parameters.
Note that even though we used red and blue for the gradient, they are not entirely visible. This is because hairs get their UV coordinates from the root object and our hair model only uses the middle part of this plane. Therefore, only the middle part of the gradient is used.
As we mentioned before, the W coordinate of all UVW channels are zero at hair roots and it goes to 1 towards the tips. However, 2D maps in 3ds Max only use UV coordinates by default and do not use the W coordinate. In order to apply this gradient from the root towards the tip of the hairs, we need to rotate this map. We accomplish this by changing the U Angle property of the gradient map (on the Coordinates rollout). When we set the U Angle property to 90, the gradient map uses VW coordinates instead of UV. Let's render the perspective viewport again to see the result.

As you can see, the roots of the hairs are now red, the middle sections are green, and the tips are blue. This technique can be used with any 2D map in 3ds Max to apply it along the hair strands from their root to their tips.
If you use a complicated map instead of this simple gradient, you will notice that the map colors will not get properly renderer. This is because by default the hair color is computed only at hair vertices. For better image quality you can tell Hair Farm to compute hair color on every pixel instead of just hair vertices. You accomplish this from the Hair Farm Renderer parameters in the render effects settings of 3ds Max. When you turn off the Speed Up (Per Vertex Shading) parameter, or when you use it for lighting and shadows only, the hair material is computed on every pixel. Doing this is also necessary for producing high quality speculars.


